
Gujarati Chapatis.
The thing about being Indian is that within that identity, there are several sub-identities. There are well over twenty official languages spoken in the country, many different faiths, spiritual practices, ways of wearing saris… the list goes on. When it comes to cuisine, it’s the same. Take chapatis, for example; I grew up eating my mother’s thin, delicate, feminine, pale, dainty chapatis, dripping with home made ghee, but often desired my Punjabi or Muslim aunties’ bigger, thicker, stretchy, more masculine ones. My Indian family friends, similarly, had cravings for my mother’s versions, or ‘auntie Sarla’s chapatis’.
Practice makes perfect
It makes sense to have different types of chapati, because they each lend themselves to different food. The thicker ones are best suited to meat dishes, and robust bean and vegetable dishes, whereas the Gujarati ones suit lighter, simpler, everyday vegetarian food. Many people are nervous about trying to make home made chapatis, and of course you can easily buy ready ones nowadays. However, I’d urge you to give these a go, as there’s nothing more satisfying than practicing and perfecting the technique. And of course, home cooked food is the best tasting and most nourishing food one can eat. I am able to roll my chapatis into the desired round shape, as I learned to make them during a 6 month stay in India after my A’ levels, and my perfectionist nature ensured that I practiced daily until I was happy with my newly acquired skill! Not boasting, just saying….
Ingredients to make eight to ten chapatis:
Around 8oz medium brown wheat chapati flour
1 tbsp rapeseed oil+ a few extra drops for the final knead
A pinch of salt
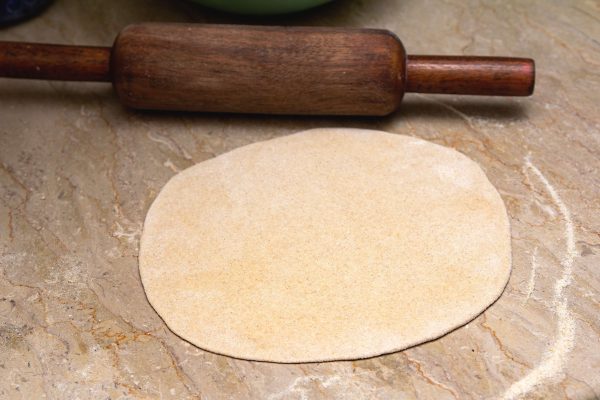
You will need a wooden chapati board, or chopping board, a rolling pin, a flat chapati pan or pancake pan, and some flour.
Method:
Put the ingredients in a mixing bowl. Fill a measuring jug with around 200 ml of hot water, and slowly add 50 ml of it to the mixture. Start binding everything together with your hand, and gradually add 25 ml more water at a time, as you continue to bind. Be careful not to add too much water; it’s better to add less than you think you need each time, but you will probably end up using around 125 ml in total. Keep binding, and start to knead the dough until all the flour mixture and liquids have been incorporated, and you have soft, smooth, pliable dough. Add a few more drops of oil and knead again for two minutes. Cover the bowl with a tea towel and leave the dough to rest for at least half an hour.
When you are ready to make the chapatis, shape the dough into walnut-sized balls, and flatten them slightly. Sprinkle a little flour on the wooden board and spread it around a bit, then roll each ball into a round disc of around five inches diameter, lifting it after a couple of rolls, and sprinkling more flour so it doesn’t stick. Put each finished chapati on a large platter, slightly spread out. If you put them in a pile they will stick together.
When you have finished, heat the flat pan slowly until it is very hot, and then turn the heat down to medium. Place a chapati on the pan and when the down-side starts to slightly brown, turn it over. Use a clean tea towel or small cloth scrunched into a ball to press gently on the chapati, and continue until both sides are speckled with brown. If you are brave enough, and have a gas cooker, you can take metal cooking tongs and hold the chapatis over a high flame to puff them up and cook a little further. Smear one side with a little ghee (It is easiest to take a teaspoon of ghee and rub the chapati with the base of the spoon until some of the ghee melts and covers the entire surface). You will only use a little of the ghee from the spoon for each chapati.
As you make each chapati, place it on a piece of baking foil that is long enough to then fold and cover the chapatis. Keep adding your cooked chapatis to the pile and covering them to keep them warm.
Best eaten fresh and hot, with your favourite vegetable curry.